
If you’re interested in decentralized finance and want to learn how to trade on 1inch, you’ve come to the right place. 1inch is a decentralized exchange aggregator that sources liquidity from various decentralized exchanges to provide the best trading rates to its users. Whether you’re a beginner or an experienced trader, this step-by-step tutorial will guide you through the process of trading on 1inch.
Step 1: Connect your Wallet
The first step to trading on 1inch is to connect your wallet. 1inch supports various wallets, including MetaMask, WalletConnect, Ledger, and more. Simply click on the wallet icon in the top right corner of the 1inch website and choose your preferred wallet. Follow the instructions to connect your wallet and make sure to grant the necessary permissions.
Step 2: Choose your Tokens
Once your wallet is connected, you can start trading on 1inch. The next step is to choose the tokens you want to trade. 1inch supports a wide range of tokens, including popular ones like Ethereum (ETH) and Binance Coin (BNB), as well as lesser-known tokens. Use the search bar or browse the available tokens to find the ones you want to trade.
Step 3: Set your Trading Parameters
After selecting the tokens, you need to set your trading parameters. This includes the amount of tokens you want to trade, the type of transaction (buy or sell), and any additional settings like slippage tolerance or gas fees. Take your time to adjust these parameters according to your preferences and trading strategy.
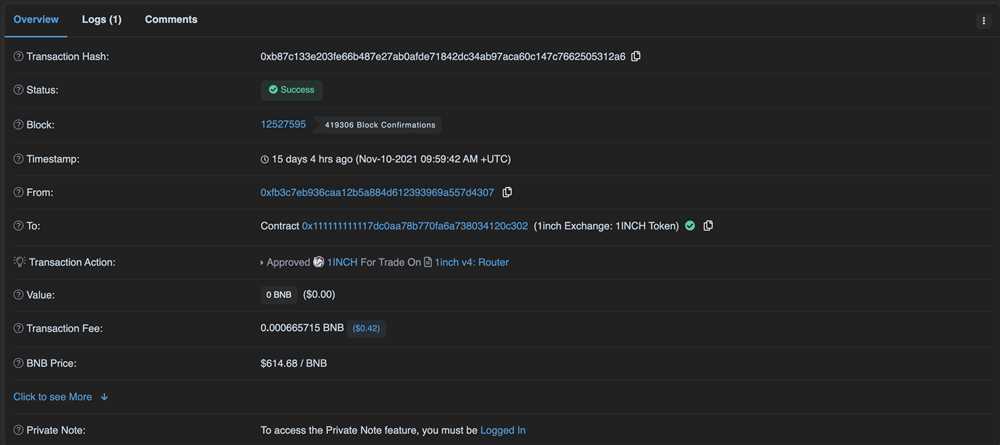
Step 4: Review and Confirm the Trade
Once you’ve set your trading parameters, it’s important to review them before confirming the trade. Double-check the token pair, the amount, the transaction type, and any other settings. Make sure everything is correct and meets your requirements. When you’re ready, click on the “Swap” or “Trade” button to initiate the trade.
Step 5: Approve and Execute the Trade
After confirming the trade, you may need to approve the transaction on your wallet. This is a security measure to ensure that you authorize the trade. Follow the instructions on your wallet and approve the transaction if prompted. Once the transaction is approved, the trade will be executed, and you’ll receive the tokens in your wallet.
Conclusion
Trading on 1inch is a simple and efficient way to access decentralized finance and take advantage of the best trading rates. By following this step-by-step tutorial, you’ll be able to navigate the 1inch platform and execute trades with ease. Remember to always do your own research and exercise caution when trading cryptocurrencies.
Step 1: Creating an Account on 1inch
To start trading on 1inch, you will need to create an account on the platform. Creating an account is a simple process that can be completed in a few easy steps.
1. Visit the 1inch Website
Open your preferred web browser and navigate to the 1inch website at https://1inch.exchange/.
2. Click on “Connect Wallet”
Once you are on the 1inch homepage, locate the “Connect Wallet” button on the top right corner of the page, and click on it.
3. Choose Your Wallet Provider

A pop-up window will appear, displaying a list of supported wallet providers. Choose the wallet provider that you prefer to use.
4. Connect Your Wallet
Follow the instructions provided by your chosen wallet provider to connect your wallet to the 1inch platform. This may involve logging in to your wallet or approving a connection request.
5. Set Up Your Account
Once your wallet is connected, you will be redirected to the 1inch platform. Here, you can set up your account by choosing a username and password. Make sure to choose a strong password to protect your account.
That’s it! You have successfully created an account on 1inch and are ready to start trading. Remember to always practice caution and do your own research before making any trades on the platform.
Creating a Wallet on Ethereum Network
Before you start trading on 1inch, you need to have a wallet on the Ethereum network. Here’s a step-by-step guide on how to create a wallet:
Step 1: Choose a Wallet Provider
There are several wallet providers you can choose from, such as MetaMask, MyEtherWallet, or Trust Wallet. You can download their mobile apps or browser extensions to get started.
Step 2: Set Up Your Wallet
Once you have chosen a wallet provider, you need to set up your wallet. This typically involves creating a password and backing up your wallet’s recovery phrase. Make sure to choose a strong password and store your recovery phrase in a safe place.
Step 3: Add Ethereum to Your Wallet
After setting up your wallet, you need to add some Ethereum (ETH) to it. You can purchase ETH on a cryptocurrency exchange and then transfer it to your wallet’s address. Alternatively, you can use a decentralized exchange (DEX) like Uniswap to swap other cryptocurrencies for ETH.
Step 4: Connect Your Wallet to 1inch
Once you have Ethereum in your wallet, you can connect it to the 1inch platform. To do this, go to the 1inch website and click on the “Connect Wallet” button. Select your wallet provider from the list, and follow the prompts to connect your wallet.
Step 5: Start Trading on 1inch
Now that your wallet is connected, you can start trading on 1inch. You can search for the token pairs you want to trade, specify the amount you want to swap, and choose whether you want to use the “Swap” or “Limit” order type. Once you have entered all the necessary details, click on the “Swap” button to complete the trade.
Note: Trading on 1inch involves interacting with smart contracts and cryptocurrency markets, which carries risks. Make sure to do your own research and exercise caution when trading.
By following these steps, you can create a wallet on the Ethereum network and start trading on 1inch. Happy trading!
Step 2: Connecting Your Wallet to 1inch
Before you can start trading on 1inch, you need to connect your wallet to the platform. 1inch supports a variety of wallets including MetaMask, WalletConnect, and Ledger. Follow these steps to connect your wallet:
| 1. | Open the 1inch website and click on the “Connect Wallet” button located in the top right corner of the page. |
| 2. | A pop-up will appear with a list of supported wallets. Select your preferred wallet from the list. |
| 3. | If you are using MetaMask, you will be prompted to sign in to your wallet. Enter your password or use your biometric authentication to unlock your wallet. |
| 4. | Once your wallet is connected, you will be able to see your wallet address in the top right corner of the page. This confirms that your wallet is successfully connected to 1inch. |
By connecting your wallet to 1inch, you can have direct access to your funds and seamlessly execute trades on the platform. It is important to ensure that you are connecting your wallet to the official 1inch website and not a phishing site to protect your funds and personal information.
Connecting Your Wallet to 1inch Exchange
To begin trading on 1inch Exchange, you will need to connect your cryptocurrency wallet to the platform. By connecting your wallet, you will have access to your funds, be able to make trades, and interact with smart contracts on the Ethereum blockchain.
Step 1: Select a Wallet
1inch Exchange supports a variety of wallets including MetaMask, Coinbase Wallet, Ledger, and Trezor. Choose a wallet that you currently use or download and set up a wallet of your choice.
Step 2: Open the 1inch Exchange Website
Open your preferred web browser and navigate to the 1inch Exchange website at https://1inch.exchange/.
Step 3: Connect Your Wallet
On the 1inch Exchange website, you will see a “Connect Wallet” button. Click on this button to start the wallet connection process.
A pop-up window will appear, displaying a list of compatible wallets that you can connect. Select your wallet from the list.
Depending on your wallet provider, you may be prompted to enter your wallet password or complete a verification process. Follow the instructions provided by your wallet to complete the connection.
Step 4: Confirm Connection
After successfully connecting your wallet, a confirmation message will be displayed on the 1inch Exchange website. You will now be able to see your wallet address and balance on the platform.
It is essential to verify that the wallet address displayed on the 1inch Exchange website matches the address of your connected wallet. This ensures that you have connected the correct wallet and can safely proceed with trading.
Note: 1inch Exchange does not have access to your wallet or private keys. The connection process only allows the platform to interact with your wallet to execute trades.
Conclusion
Connecting your wallet to 1inch Exchange is a crucial step in beginning your trading journey. It provides you with access to your funds and enables you to execute trades on the platform securely. Follow the steps mentioned above to connect your wallet and start trading on 1inch Exchange.
Step 3: Trading on 1inch Exchange
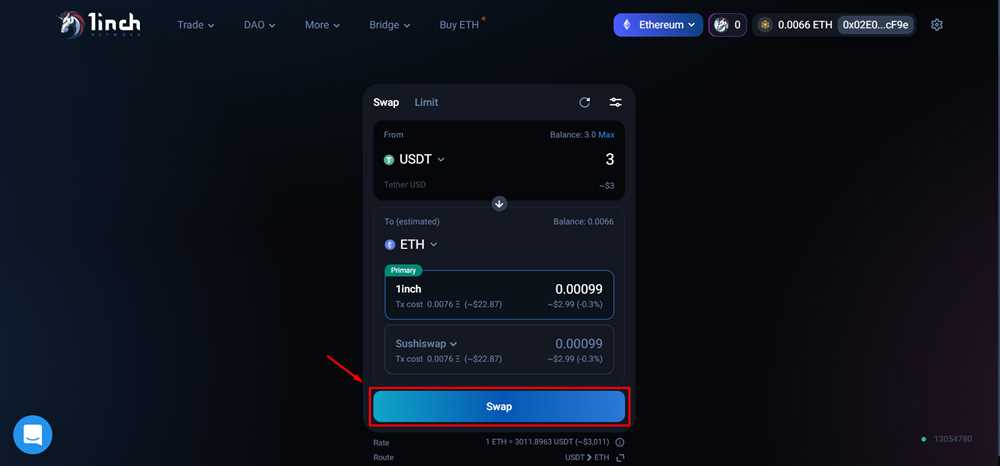
Now that you have connected your wallet and explored the available tokens on the 1inch Exchange, you are ready to start trading. Follow these steps to trade on 1inch:
- Select the token pair you want to trade:
- Choose your preferred trading strategy:
- Set the desired amount for your trade:
- Review and confirm your trade:
- Execute your trade:
On the 1inch interface, you will see a list of token pairs available for trading. Choose the tokens you want to trade by selecting them from the drop-down menus. For example, if you want to trade Ethereum for DAI, select ETH (Ethereum) from the first menu and DAI from the second menu.
1inch offers different trading strategies that you can choose from. Each strategy has different parameters and functions based on your preferences and trading goals. Some strategies focus on finding the best price, while others prioritize low slippage or guaranteed execution. Select the strategy that aligns with your trading objectives.
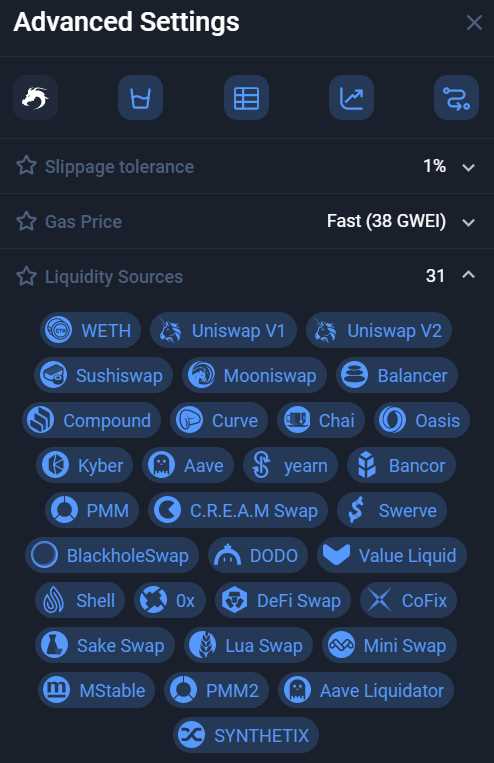
Enter the amount of the token you want to trade. This can be in the desired token or in the base token. You can also adjust the slippage tolerance, which determines the acceptable deviation from the expected trade price. Keep in mind that higher slippage tolerance may provide better trade execution, but it also carries more risk.
Before executing your trade, carefully review all the details on the 1inch interface. Make sure you have selected the correct token pair, trading strategy, and entered the right trade amount. Take note of any fees or estimated gas costs associated with the trade as well.
Once you are satisfied with the trade details, click on the “Swap” or “Trade” button to execute your trade. Confirm the transaction using your wallet and wait for the trade to be processed. You can monitor the progress of your trade on the 1inch interface or through your wallet.
Congratulations! You have successfully traded on the 1inch Exchange. Remember to always double-check your trade details and assess the market conditions before making any trades. Happy trading!
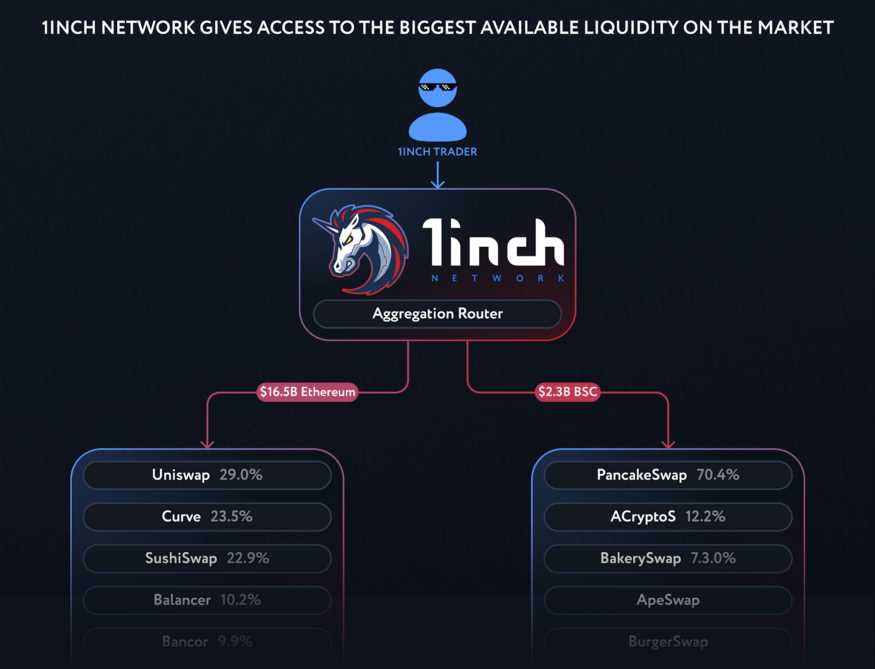
Exploring Trading Features on 1inch
1inch is a decentralized exchange aggregator that allows users to trade across multiple platforms and find the best prices for their trades. In this article, we will explore the different trading features offered by 1inch and how you can make the most of them.
The Universal Swap
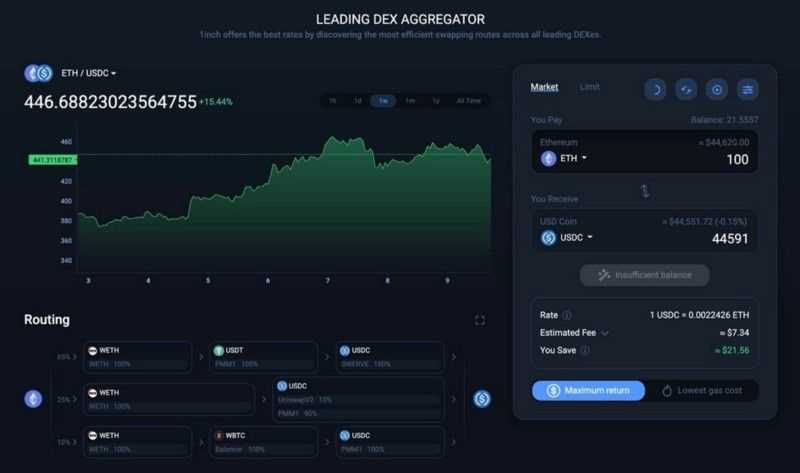
One of the key features of 1inch is the Universal Swap. This allows users to easily swap tokens across different protocols and liquidity sources. The Universal Swap compares prices and liquidity from various platforms, including decentralized exchanges and automated market makers, to ensure users get the best possible price for their trades.
When using the Universal Swap, you can select the tokens you want to trade and choose the source token and destination token. 1inch will then search for the best prices across various platforms and provide you with the most optimal route for your trade. You can see the estimated price slippage and the amount of tokens you will receive before executing the swap.
The Universal Swap feature is extremely useful for traders who want to get the best price for their trades without having to manually search through different platforms.
Liquidity Provider and Yield Farming
1inch also offers liquidity provider and yield farming opportunities. By providing liquidity to different pools, users can earn trading fees and additional rewards in the form of tokens. 1inch supports various liquidity pools, including popular ones like Uniswap and SushiSwap.
To participate in liquidity providing and yield farming, users can select the desired pool and deposit their tokens. In return, they will receive LP tokens, which represent their share of the liquidity pool. These LP tokens can then be staked to earn trading fees and rewards.
1inch also offers an aggregator for yield farming called Mooniswap. This aggregator optimizes yield farming strategies to maximize returns for users. By using Mooniswap, users can automatically switch between different pools to earn the highest yield possible.
Overall, 1inch provides a range of trading features that cater to both casual users and professional traders. Whether you are looking for the best prices for your trades or opportunities to earn additional rewards through liquidity providing and yield farming, 1inch has you covered.
Question-answer:
What is 1inch?
1inch is a decentralized exchange aggregator that sources liquidity from various exchanges to give users the best possible trading rates. It allows users to trade various cryptocurrencies in a fast and efficient manner.
How does 1inch work?
1inch works by splitting user’s trading orders across multiple decentralized exchanges to ensure the best possible rates. It uses an algorithm to search for the most optimal routes for each trade and executes them automatically.
How can I start trading on 1inch?
To start trading on 1inch, you need to connect your wallet to the platform. Once your wallet is connected, you can select the tokens you want to trade and specify the amount you want to buy or sell. 1inch will then search for the best rates and execute the trade on your behalf.
Is 1inch safe to use?
1inch is considered to be safe to use as it does not hold users’ funds and does not require users to provide their private keys. However, it is always recommended to exercise caution and do your own research before using any decentralized exchange or trading platform.